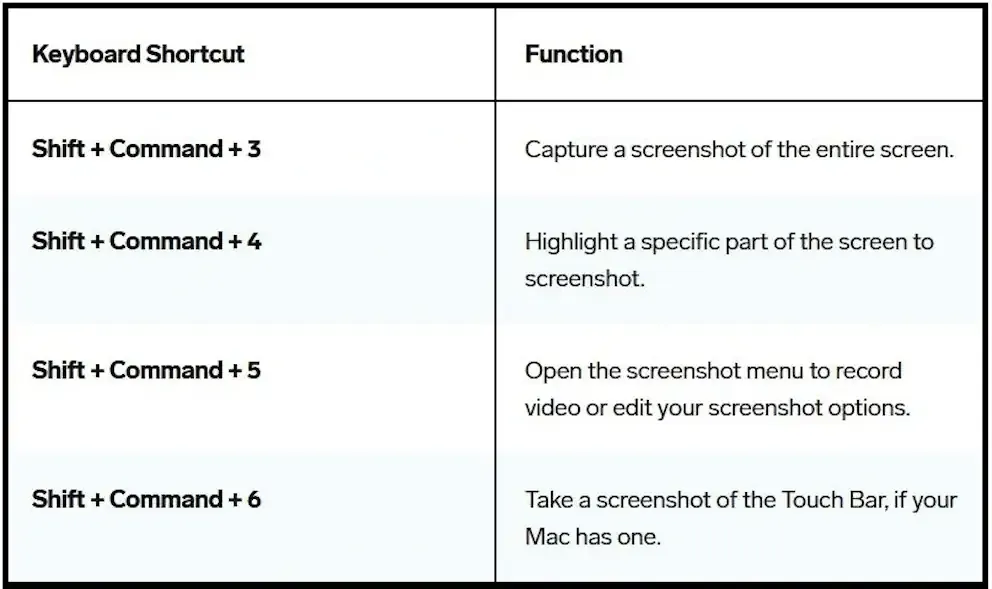
These tips outline ways how to take screenshots on your Mac computer
1. To take screenshots use the Shift key, and Command key, and then tap Number 3.
To take a screenshot on a Mac Computer, press and hold these two keys together: Shift key, Command key, and then tap Number 3.

You can tap Number 3 as many times as you want to take a screenshot while holding down the Shift key and Command key. There will be a camera sound each time you press Number 3 indicating each screenshot.
Then you will see a thumbnail (small picture icon) immediately pop at the corner of your desktop screen, click it to edit the screenshot. The file format is most likely going to be in .PNG and the filename will carry the date and time of the screenshot example "Screen Shot 2024-02-02 at 10:55.12 AM"
The screenshot will capture whatever is on the entire desktop screen.
2. Screenshot using the Command key, Control key, and Shift key, and then Number4.
To screenshot a part of the screen to the clipboard, then paste it to any application like Keynote, press and hold down the Command key, Control key, and Shift key, and then tap Number4.

A cross-hair cursor will appear and you can click and drag to select the area you wish to capture. When you release the mouse button, you can paste the screenshot to another application.
3. Screenshot using The Command key + Shift key and the Number 4
To screenshot a portion of the screen or any part of the screen, press and hold down The Command key + Shift key and tap the Number 4” keyboard shortcut to take a screenshot of a selected screen region.
A cross-hair cursor will appear and you can click and drag to select the area you wish to capture. When you release the mouse button, you will see a thumbnail (small picture icon) immediately pop at the corner of your desktop screen.
4. To Capture a specific part of the window 1. Open the window that you want to capture. 2. Press and hold the "Command key", "Shift key", and “Number 4” and then tap the “Space bar” keys at the same time.

- Your mouse cursor will change to a camera icon. Click on the Minecraft window to capture it.
- You can see a thumbnail (small picture icon) in the corner of your screen. Click it to edit the screenshot if you want.
5. Using the Screenshot app.
Current versions of the MacOS (Mojave, Catalina, Big Sur, Monterey, and Ventura) come with a Screenshot app.
Press and hold the Shift key Command key and tap Number 5. It opens the Screenshot app. A small menu panel will appear at the bottom of the screen.
The three icons on the left, allow you to take a screenshot of the entire screen, a specific window, or a highlighted section. The next two icons to the right will let you record a video of the entire screen or just a highlighted section. Click on one of the options on the left to select how you want to take a screenshot.
Click the Capture button on the far right to take the screenshot.

6. How to take screenshots using the Touch Bar (if you are using a newer Macbook Pro)
You can easily take screenshots using a Macbook Pro with a Touch Bar. You can add the screenshot feature to your Touch Bar and capture anything on your Mac’s screen with only one tap.
How to take a screenshot on Mac by using the Touch Bar
You can add the screenshot button to your Touch Bar to quickly take a screenshot by clicking the button. Please check the steps below.
Step 1. Go to the "Control Strip" section of the "System Preferences" menu and select the "Screenshot" option.
Step 2. Use the "Customize Control Strip" button to add the "Screenshot" button to the Touch Bar.
Step 3. When you tap the "Screenshot" button on the Touch Bar, you can capture a selected portion, a window, or the entire screen. The screenshot will be saved to your desktop.
How to capture the screenshot of the Touch Bar
Want to take a screenshot of your Touch Bar? You simply press the “Command key + Shift key+ Number 6” keys to capture the entire Touch Bar and save the screenshot to your desktop.

MacOS Screenshot Shortcuts


